Hey there, fitness enthusiasts! So, you’ve decided to take on the challenge of front squatting with 50kg, huh? Well, kudos to you because front squats are an excellent exercise for building strength and working those lower body muscles. But before you dive into it, you’ll want to make sure your form is on point.
In this blog post, we’re going to break down the essential form checks you need to consider to perform a safe and effective front squat at this weight.
Whether you’re a seasoned lifter or just starting out, these tips will help you get the most out of your workout while keeping you injury-free. Let’s get started!
Understanding the perfect form to consider For a Front Squat of 50kg.
When performing a front squat with 50kg, it’s important to maintain proper form to ensure safety and effectiveness.
Here’s a step-by-step form check to consider:
- Set Up:
- Begin by setting the barbell on a squat rack at about chest height.
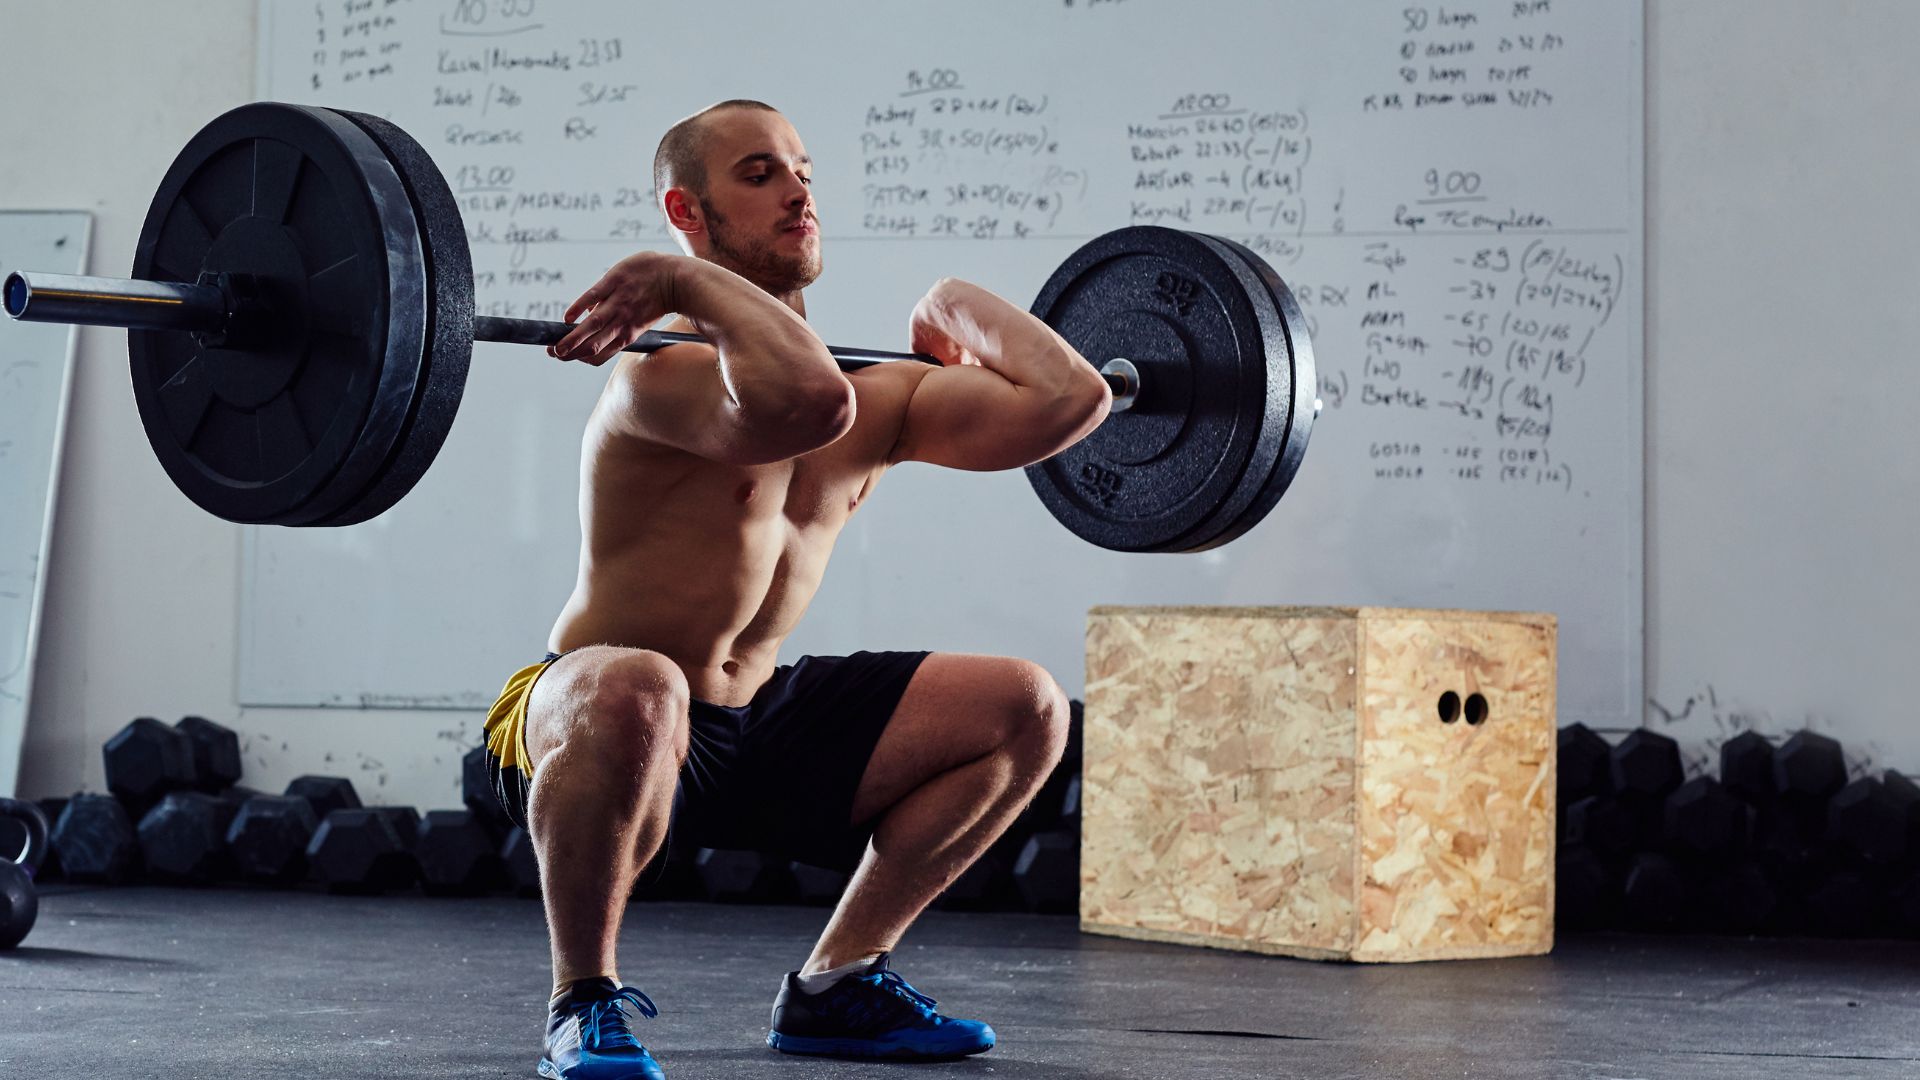
- Approach the bar and position yourself so that it rests across the front of your shoulders (clavicles) with a clean grip (fingers under the bar, elbows pointing forward, and upper arms parallel to the ground).
- Step under the bar and lift it off the rack by straightening your hips and knees.
- Foot Placement:
- Stand with your feet shoulder-width apart or slightly wider. Your toes can be pointed slightly outward.
- Posture:
- Keep your chest up and your back straight. Engage your core muscles to maintain a stable spine.
- Depth:
- Lower yourself by bending at the hips and knees. Aim to squat down until your thighs are parallel to the ground or as low as your mobility allows while maintaining good form.
- Avoid excessive forward leaning or rounding of the lower back.
- Knee Position:
- Ensure that your knees track over your toes as you descend and ascend. They should not cave inward (valgus collapse) or push excessively forward.
- Hip Hinge:
- Initiate the movement by pushing your hips back slightly as you begin to descend. This helps you maintain balance and engages your glutes and hamstrings.
- Elbow Position:
- Keep your elbows up and pointing forward throughout the movement. This helps to prevent the bar from rolling off your shoulders.
- Breathing:
- Take a deep breath before you start your descent and hold it until you return to the starting position. This helps stabilize your core and spine.
- Ascent:
- Push through your heels to stand up, extending your hips and knees simultaneously.
- Balance:
- Maintain an even distribution of weight on both feet throughout the lift. Avoid leaning forward or backward.
- Control:
- Lower the barbell back onto the rack with control once you’ve completed your set.
- Safety:
- Always have a spotter or use safety bars when front squatting heavy weights to ensure your safety in case you can’t complete the lift.
- Progression:
- Gradually increase the weight as your strength and form improve. Don’t sacrifice form for heavier weights.
- Mobility:
- Work on your hip, ankle, and thoracic spine mobility to enhance your front squat form over time.
Remember, it’s essential to prioritize proper form over the amount of weight lifted.
If you’re unsure about your form, consider working with a certified trainer or coach who can provide feedback and guidance to help you improve your front squat technique.
Further Explanations.
Let’s dive deeper and elaborate further on all the points mentioned.
Firstly, let’s break down the “Set Up” and “Foot Placement” aspects of proper front squat form in more detail:
Set Up:
Barbell Height:
Before you start, adjust the squat rack so that the barbell is positioned at about chest height. This allows you to easily lift the bar off the rack without straining yourself.
Approach the Bar:
Stand facing the barbell with your feet about hip-width apart. Ensure that the bar is centered in the rack.
Clean Grip:
To achieve a clean grip:
Place your hands on the barbell with your palms facing upward and your fingers gripping the bar from underneath.
Your hands should be positioned slightly wider than shoulder-width apart.
The key is to keep your elbows pointing forward and your upper arms parallel to the ground. This creates a “shelf” for the bar to rest on.

Positioning Under the Bar:
Carefully step forward and position yourself so that the barbell rests across the front of your shoulders (clavicles).
Make sure that your chest is up, and your back is straight. Engage your core muscles to maintain stability.
Lifting the Bar:
To lift the bar off the rack, push through your hips and knees while keeping your back straight.
Stand fully upright with the barbell in front of your shoulders.
Foot Placement:
Stance Width:
Stand with your feet shoulder-width apart or slightly wider. This provides a stable base of support for the front squat.
Toes Outward:
You can point your toes slightly outward, typically at an angle of about 5-20 degrees depending on your comfort and mobility.
Pointing your toes slightly outward can help with hip mobility and prevent your knees from collapsing inward during the squat.
Weight Distribution:
Make sure your weight is evenly distributed across both feet. Avoid leaning excessively forward or backward.
By following these specific instructions for the set-up and foot placement, you can establish a strong foundation for your front squat and reduce the risk of injury while effectively targeting the muscles you intend to work during the exercise.
let’s delve into more detail about the aspects of “Posture” and “Depth” when performing a front squat:
Posture:
Chest Up:
Keeping your chest up is crucial for maintaining an upright and stable position during the front squat. Imagine trying to display your chest to the ceiling throughout the movement.
Back Straight:
Your back should remain straight, without rounding or excessive arching, from your lower back to your upper back. A neutral spine position is essential for distributing the load evenly and preventing injury.
Engage Core Muscles:
Engaging your core muscles means contracting your abdominal muscles and lower back to stabilize your spine. This provides additional support and helps protect your lower back from undue stress.
Depth:
Bending at Hips and Knees:
To initiate the squat, start by bending at both your hips and knees simultaneously. This movement should be coordinated to maintain balance and control.
Thigh Parallel to Ground:
Ideally, aim to squat down until your thighs are parallel to the ground. This ensures that you’re achieving a full range of motion and effectively engaging the muscles in your legs and hips.
Mobility and Comfort:
While parallel is the target, your depth can vary depending on your mobility and comfort level. It’s more important to maintain good form than to force yourself into an uncomfortable or unsafe position.
Avoid Forward Leaning and Rounding:
As you squat, be mindful not to lean excessively forward, which can put undue stress on your lower back and knees.
Additionally, avoid rounding your lower back. Keeping your back straight helps distribute the load evenly and prevents injury.
Remember that maintaining proper posture and achieving an appropriate depth are critical for effective and safe front squats.
If you’re unsure about your form or depth, it’s a good idea to seek guidance from a certified trainer or coach who can provide feedback and help you improve your technique.
Let’s break down the aspects of “Knee Position” and “Hip Hinge” during a front squat with more specificity:
Knee Position:
Knees Tracking Over Toes:
Throughout the front squat, pay close attention to the position of your knees. They should move in the same direction as your toes.
This means that as you descend and ascend, your knees should stay in line with your toes.
Avoiding Valgus Collapse:
One of the most important aspects of knee positioning is to prevent valgus collapse, which occurs when the knees cave inward toward each other. This can put excessive stress on the knee joint and increase the risk of injury.
Avoid Excessive Forward Push:
Additionally, ensure that your knees do not push excessively forward past your toes as you descend. This can also lead to unnecessary strain on the knees.
Hip Hinge:
Initiating the Movement:
As you begin the descent phase of the front squat, initiate the movement by pushing your hips back slightly. This hip hinge action helps you maintain balance and control throughout the squat.
Engaging Glutes and Hamstrings:
The hip hinge engages your gluteal (butt) muscles and hamstrings. This engagement is important for generating power and stability during the squat.
Maintain an Upright Torso:
While hinging at the hips, it’s essential to keep your torso as upright as possible. This ensures that your spine remains in a safe and neutral position.
By focusing on proper knee positioning and initiating the squat with a hip hinge, you’ll not only improve your front squat form but also reduce the risk of injury and maximize the effectiveness of the exercise.
Remember that practicing these techniques with lighter weights before attempting heavier loads can help reinforce good form and motor patterns.
Let’s delve into more detail about the aspects of “Elbow Position” and “Breathing” during a front squat:
Elbow Position:
Elbows Up:
During the entire front squat movement, it’s crucial to keep your elbows up and pointing forward. This means that your elbows should be positioned higher than your hands, creating a horizontal or slightly upward angle with your upper arms.
Preventing Bar Roll:
The primary purpose of keeping your elbows up is to prevent the barbell from rolling forward off your shoulders. By creating a stable shelf with your shoulders and upper arms, you secure the barbell in place.
Clean Grip Reinforcement:
This elbow position complements the clean grip you established during the setup. Together, they ensure that the bar remains securely positioned on the front of your shoulders throughout the squat.
Breathing:
Deep Breath Before Descent:
Before you start the descent phase of the front squat, take a deep breath. Inhale deeply through your nose or mouth to fill your lungs with air. This action helps increase intra-abdominal pressure, which stabilizes your core and spine.
Holding Breath:
After taking that deep breath, hold it in as you perform the squat. This is often referred to as the “Valsalva maneuver.” Holding your breath in this way creates a stable core and a rigid abdominal wall, which is essential for supporting your spine under the load of the barbell.
Exhale at the Top:
Exhale only when you’ve returned to the starting position and completed the lift. This allows you to release the pressure and prepare for your next breath.
By maintaining the correct elbow position and following the breathing technique, you not only enhance your front squat’s effectiveness but also significantly reduce the risk of losing control of the barbell or experiencing spinal issues.
These aspects are fundamental to performing a safe and efficient front squat.
Let’s explore the aspects of “Ascent” and “Balance” during the front squat in more detail:
Ascent:
Push Through Heels:
During the ascent phase of the front squat, your primary focus should be on pushing through your heels. This action engages your quadriceps, glutes, and hamstrings to help you stand up with the barbell.
Think about driving your heels into the ground as you rise.
Extending Hips and Knees Simultaneously:
To achieve a smooth and efficient ascent, extend your hips and knees simultaneously. This coordinated movement allows you to generate power from both your hip and knee extensor muscles.
Avoid the temptation to “lead” with one joint over the other; instead, they should work together.
Balance:
Even Weight Distribution:
Maintaining balance during the front squat is crucial for stability and safety. Ensure that your weight is evenly distributed across both feet throughout the lift.
Avoid shifting your weight excessively to the front or back. This can lead to loss of control and potential accidents.
Avoid Leaning Forward or Backward:
As you ascend, concentrate on keeping your torso upright. Avoid leaning forward, which can put additional stress on your lower back, or leaning backward, which may result in losing control of the bar.
Engaging your core muscles and maintaining a neutral spine can help you maintain this balance.
Controlled Movement:
The ascent should be a controlled, deliberate movement. Rushing or using momentum can compromise balance and form.
By focusing on a controlled ascent and maintaining proper balance, you’ll maximize the effectiveness of the front squat while minimizing the risk of injury. Practice and consistency are key to developing the strength and coordination needed to perform this movement with excellent balance.
let’s discuss the aspects of “Control” and “Safety” when performing front squats:
Control:
Lowering the Barbell:
After completing your set of front squats, it’s essential to lower the barbell back onto the squat rack with control.
Maintain proper form as you carefully guide the barbell onto the rack’s supports. Avoid dropping it or allowing it to crash onto the rack, as this can damage the equipment and pose a safety risk.
Safety:
Spotter:
When front squatting heavy weights, it is highly advisable to have a spotter present. A spotter can provide assistance and ensure your safety in case you struggle to complete a repetition or need help reracking the bar.
Your spotter should be familiar with proper spotting techniques for the front squat.
Safety Bars or Pins:
If you’re lifting heavy weights and don’t have a spotter, using safety bars or safety pins on the squat rack is essential. These bars or pins can catch the barbell if you fail to complete a repetition or if your form breaks down.
Set the safety bars or pins at an appropriate height just below your lowest squat depth to ensure they’ll be effective in preventing the bar from falling on you.
Warm-Up Sets:
Before attempting heavy front squats, it’s a good practice to start with warm-up sets using lighter weights. Gradually increase the weight as you progress through your sets.
This not only prepares your muscles and joints for the heavier loads but also helps you gauge your readiness for the challenging sets.
Proper Progression:
Avoid attempting weights that are too heavy for your current level of strength and experience. Gradually progress in weight over time as you build strength and confidence in your front squat form.
By prioritizing control during the descent and reracking of the barbell, and by following safety precautions such as having a spotter or using safety bars, you can significantly reduce the risk of accidents and injuries during your front squat workouts. Safety should always be a top priority in any strength training regimen.
Let’s go into more detail about the aspects of “Progression” and “Mobility” in the context of front squat training:
Progression:
Gradual Weight Increase:
Progression in strength training is crucial for continuous improvement. As your strength and form improve, it’s advisable to gradually increase the weight you use for front squats.
Start with a weight that allows you to perform the exercise with proper form and control. Over time, incrementally increase the weight while ensuring that your technique remains sound.
Avoid the temptation to lift excessively heavy weights before you’re ready, as this can lead to compromised form and an increased risk of injury.
Form Over Weight:
Emphasize the importance of maintaining proper form at all times. It’s better to perform front squats with excellent form using a lighter weight than to sacrifice form for the sake of lifting heavier weights.
Consistency in practicing good form will ultimately lead to better results and reduced risk of injury.
Mobility:
Hip Mobility:
Adequate hip mobility is essential for achieving proper depth in the front squat without excessive forward leaning or rounding of the lower back. Exercises like hip flexor stretches, hip circles, and deep squats can help improve hip mobility.
Ankle Mobility:
Ankle mobility allows you to maintain a stable and upright position during the squat. To enhance ankle mobility, consider exercises such as ankle dorsiflexion stretches and calf raises.
Thoracic Spine Mobility:
Thoracic spine mobility helps you keep an upright torso during the front squat. Exercises like thoracic spine rotations and foam rolling can improve flexibility in this area.
Warm-Up and Mobility Routine:
Incorporate a thorough warm-up and mobility routine into your training sessions. Spend time targeting specific areas like hips, ankles, and thoracic spine before you begin front squatting.
This not only enhances your range of motion but also reduces the risk of injury and allows for better squatting mechanics.
Consistency:
Improving mobility is an ongoing process. Consistency in incorporating mobility exercises into your training regimen is key to long-term progress in front squat form.
By focusing on gradual weight progression while maintaining proper form and working on your mobility, you’ll be better equipped to perform front squats safely and effectively.
These principles not only help you maximize the benefits of the exercise but also reduce the risk of injuries associated with poor form and restricted mobility.
A complete tabular on this topic.
Here’s a tabular breakdown of the form check considerations for a front squat with a weight of 50kg:
| Aspect | Form Check for a 50kg Front Squat |
|---|---|
| Set Up | – Set the barbell on the squat rack at chest height. |
| – Position the bar across the front of your shoulders. | |
| – Use a clean grip with fingers under the bar. | |
| – Step under the bar and lift it off the rack. | |
| Foot Placement | – Stand with feet shoulder-width apart or slightly wider. |
| – Toes can point slightly outward for comfort and mobility. | |
| Posture | – Keep chest up, maintaining an upright torso. |
| – Ensure a straight back, avoiding rounding or arching. | |
| – Engage core muscles for stability. | |
| Depth | – Bend at hips and knees to squat down. |
| – Aim for thighs parallel to the ground or lower. | |
| – Avoid excessive forward leaning or lower back rounding. | |
| Knee Position | – Ensure knees track over toes, avoiding inward collapse. |
| – Avoid excessive forward knee push. | |
| Hip Hinge | – Initiate the squat by pushing hips back slightly. |
| – Maintain balance and engage glutes and hamstrings. | |
| Elbow Position | – Keep elbows up and pointing forward throughout. |
| – Prevents the bar from rolling off your shoulders. | |
| Breathing | – Take a deep breath before descending and hold it. |
| – Helps stabilize the core and spine. | |
| Ascent | – Push through heels to stand up, extending hips and knees together. |
| Balance | – Maintain an even distribution of weight on both feet. |
| – Avoid leaning forward or backward. | |
| Control | – Lower the barbell back onto the rack with control. |
| Safety | – Always have a spotter or use safety bars with heavy weights. |
This table provides a comprehensive checklist for maintaining proper form during a front squat with a weight of 50kg. Following these guidelines will help you perform the exercise safely and effectively while targeting the intended muscle groups.
Conclusion.
In conclusion, performing a front squat with a 50kg weight requires meticulous attention to form and safety.
By following the detailed form check considerations, you can ensure that your posture, depth, knee and hip positioning, and other crucial aspects are well-maintained.
Prioritizing mobility and gradual progression will aid in enhancing both your performance and safety during front squats, ultimately leading to better results and minimized risk of injury.

Hey there, it’s Mike Rrsq, the Editor-in-Chief over at Jsquat.com, and I’m absolutely obsessed with all things squat fitness! I’ve been lucky enough to get some serious recognition for my work in this field. With a solid background in the fitness and wellness industry, I’ve been there right from the get-go, helping shape this website into what it is today.
You see, I’m not just the boss around here; I’m also a passionate contributor. I love sharing my insights through my articles, and trust me, they’re not your run-of-the-mill stuff. Each piece I write is a labor of love, filled with my expertise and real-world experience in the fitness universe. So, if you’re into fitness and looking for some inspiration, you’re in the right place!