Hey there, fitness enthusiasts! Ready to take your squat game to new heights?
In our upcoming blog post, we’re diving deep into the world of high bar squats.
Whether you’re a beginner looking to perfect your form or a seasoned lifter aiming to optimize your technique, we’ve got you covered.
Stay tuned for expert insights, tips, and step-by-step guidance on how to master the high bar squat and unlock those leg gains!
Understanding the placement In high bar squat: How and why.
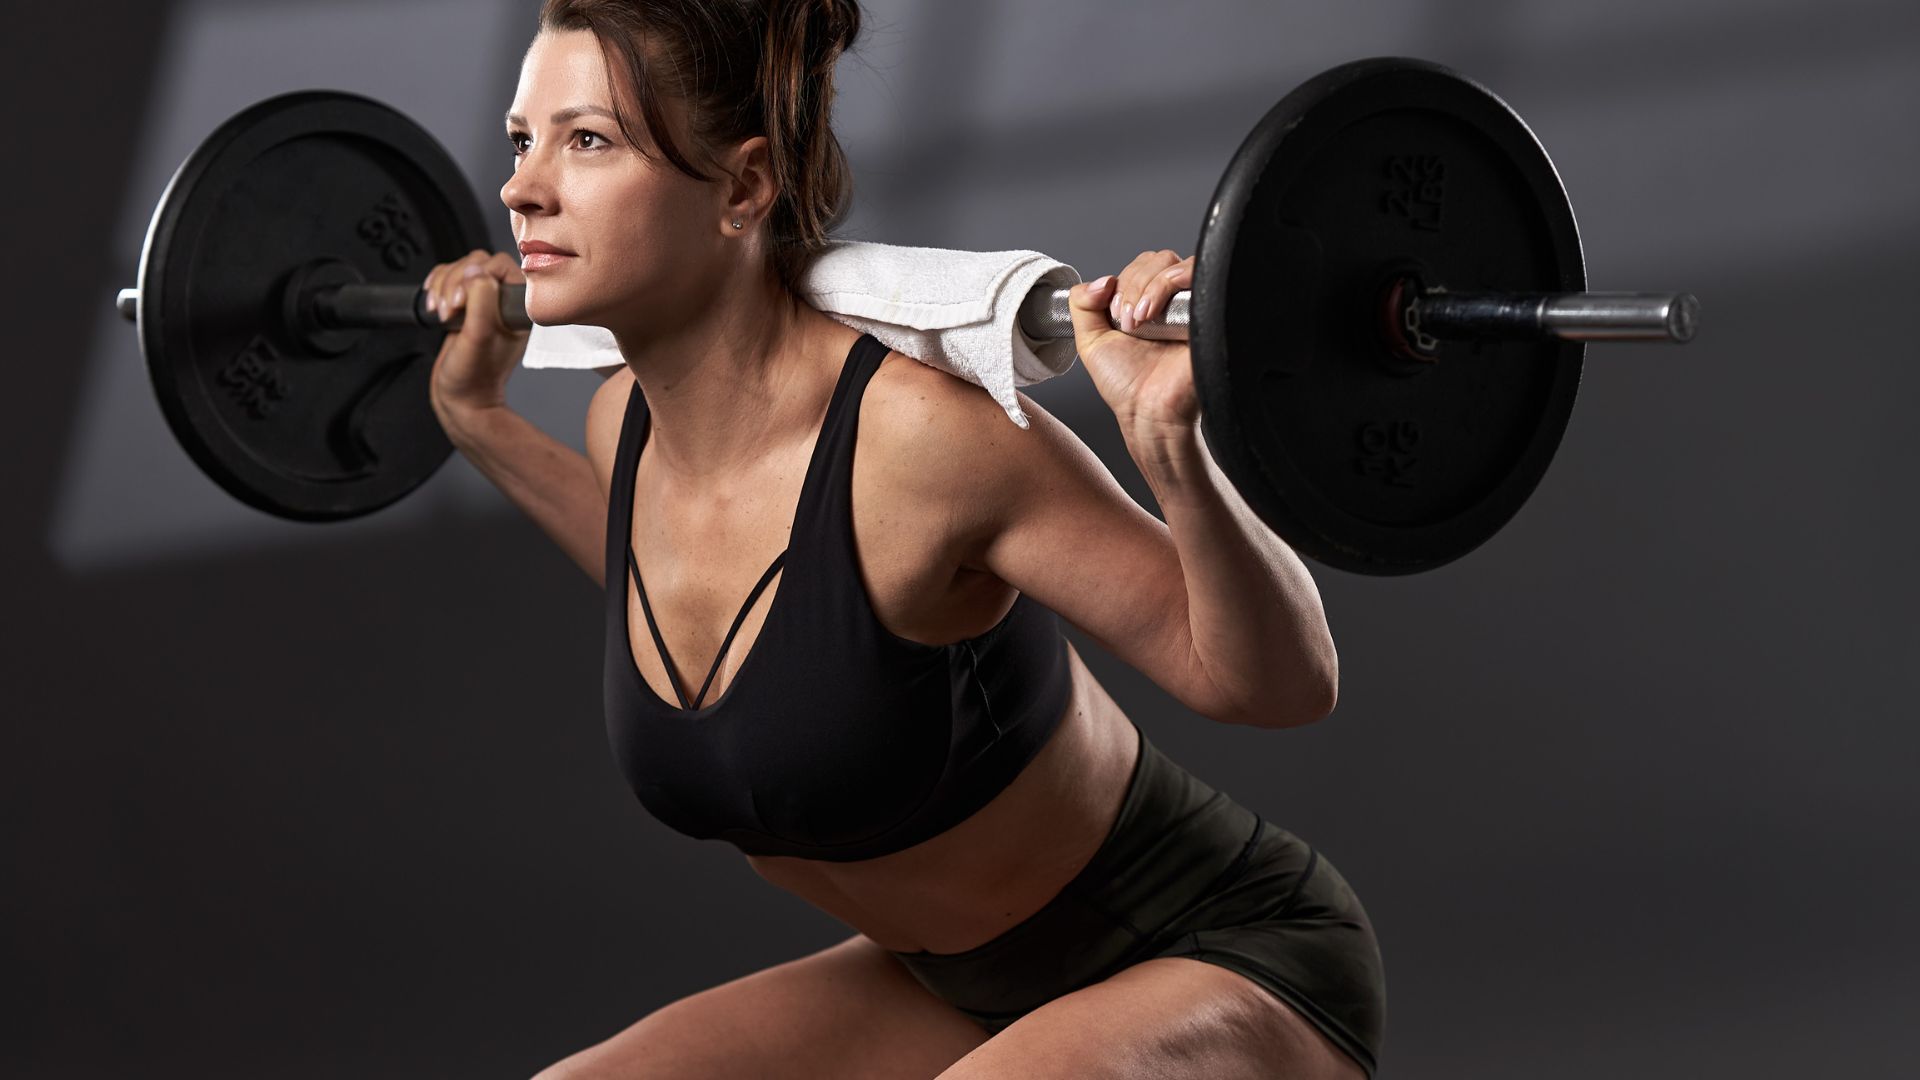
In a high bar squat, the placement of the bar on your upper back is crucial for maintaining proper form and maximizing the effectiveness of the exercise.
Here’s a detailed explanation of where and how to place the bar:
Bar Position: The high bar squat is so named because the bar is placed higher on your upper back compared to a low bar squat.
The bar should rest on the trapezius muscles, which are the large, diamond-shaped muscles that run down the middle of your upper back.
Bar Placement: To find the correct placement, follow these steps:
a. Set Up: Approach the squat rack and set the barbell at an appropriate height for your body. It should be slightly below shoulder level.
b. Unrack the Bar: Stand facing the barbell and step underneath it. Position your feet shoulder-width apart or slightly wider.
c. Bar on the Trapezius: Bend your knees slightly to get underneath the bar. The bar should sit just above the rear deltoids (the muscles on the outer edge of your shoulders) and below the base of your neck.

d. Grip Width: Grasp the bar with a grip slightly wider than shoulder-width. Your hands should be evenly spaced on the bar.
Bar Stability: Once the bar is in position, make sure it’s secure and stable. Your upper back should be tight, and your chest should be up. Squeeze your shoulder blades together to create a solid platform for the bar to rest on.
Posture: Maintain an upright torso throughout the squat. Avoid leaning forward or rounding your back, as this can lead to poor form and potential injury.
Execution: With the bar in the correct position, you can perform the squat by bending your knees and hips simultaneously, lowering your body until your thighs are at least parallel to the ground. Keep your back straight and your chest up as you perform the squat.
Breathing: Inhale deeply before descending into the squat, and exhale as you push the weight back up.
Rack the Bar: After completing your set, carefully walk back to the squat rack, align the bar with the hooks, and safely re-rack it.
Remember that proper form is essential to prevent injuries and to target the intended muscles effectively.
If you’re new to high bar squats or strength training in general, it’s a good idea to work with a qualified trainer initially to ensure your form is correct. Additionally, start with lighter weights to build your strength gradually before progressing to heavier loads.
Further Explanations.
Let’s delve deeper, let me explain these points mentioned further.
Fierst let’s dive into more detail about the bar placement and grip width for high bar squats:
Bar Placement.
a. Set Up:
Approach the squat rack and adjust the barbell to an appropriate height for your body. The bar should be set slightly below shoulder level.
This height allows you to unrack the bar comfortably without straining your shoulders or neck.
b. Unrack the Bar:
Stand facing the barbell and position yourself underneath it. Your feet should be shoulder-width apart or slightly wider. Ensure that the bar is centered on the squat rack’s hooks.
c. Bar on the Trapezius:
As you step under the bar, bend your knees slightly to get into a good starting position.
The key to proper bar placement is to have the bar rest on your trapezius muscles, which are the large, diamond-shaped muscles in your upper back.
Specifically, the bar should sit just above the rear deltoids (the muscles on the outer edge of your shoulders) and below the base of your neck.

This position distributes the weight evenly across your upper back and minimizes strain on your neck.
Grip Width.
d. Grip Width:
Grasping the bar with the correct width is essential for stability and control during the squat. Your hands should be positioned slightly wider than shoulder-width apart. Here’s how to find the right grip:
Place your hands on the bar with your palms facing forward.
Position your hands so that when you grip the bar, your forearms are roughly vertical, perpendicular to the ground. This alignment helps maintain stability throughout the lift.
Ensure that your hands are evenly spaced on the bar. A symmetrical grip prevents imbalances that can affect your form.
Some lifters prefer a thumbless grip (wrapping their thumbs around the bar), while others prefer a full grip. The choice often comes down to personal comfort and wrist flexibility. Experiment with both to see which feels more secure for you.
Having the correct grip width ensures that you can control the bar effectively and maintain balance as you squat. It also helps distribute the load evenly across your upper body and prevents excessive stress on your wrists and shoulders.
Remember that while these guidelines provide a good starting point, individual body proportions and preferences may vary.
It’s essential to feel comfortable and stable in your chosen bar placement and grip width to perform high bar squats safely and effectively.
As you gain experience, you can fine-tune these elements to suit your unique needs and biomechanics.
Let’s break down the concepts of bar stability and posture in high bar squats:
Bar Stability.
Secure and Stable Bar:
After placing the bar on your upper back as described earlier, the first priority is ensuring that it’s secure and stable in that position.
This means the bar should not move around or shift during the squat.
Upper Back Tightness:
To achieve this stability, focus on creating tension in your upper back. Imagine squeezing your shoulder blades together as if you’re trying to pinch something between them.
This action tightens the muscles of your upper back, providing a solid platform for the bar to rest on.
Tight upper back muscles also help distribute the weight evenly across your shoulders, reducing the risk of discomfort or injury.
Chest Up:
While maintaining this upper back tightness, keep your chest up and proud. This not only contributes to bar stability but also helps you maintain an upright posture throughout the squat.
A lifted chest prevents your upper body from collapsing forward, which can compromise your form and balance.
Posture.
Upright Torso:
Maintaining an upright torso is crucial in high bar squats. Your torso, which includes your chest, upper back, and spine, should remain as vertical as possible throughout the squat.
This vertical posture promotes proper weight distribution and reduces the stress on your lower back.
Avoid Leaning Forward:
Leaning forward during a squat can be problematic. It shifts the weight forward, placing excess strain on your lower back and making it more challenging to control the bar.
It can also lead to improper form, increasing the risk of injury.
Avoid Rounding Your Back:
Rounding your back, also known as spinal flexion, is a common mistake that should be avoided at all costs. It places immense pressure on the spinal discs and can lead to serious injuries.
To prevent rounding, focus on keeping your chest up and your spine in a neutral position, maintaining the natural curvature of your lower back.
By prioritizing bar stability and maintaining an upright posture, you ensure that you’re executing high bar squats safely and effectively.
Proper form not only reduces the risk of injury but also targets the intended muscles primarily the quadriceps, hamstrings, glutes, and lower back while minimizing stress on other body parts.
Remember that practicing with lighter weights and gradually increasing the load as you become more comfortable and confident with your form is a smart approach to mastering the high bar squat technique.
let’s go into detail about the execution and breathing techniques for high bar squats:
Execution.
Starting Position:
You’ve already set up with the bar correctly placed on your upper back, your upper back tight, and your chest up.
To initiate the squat, stand with your feet shoulder-width apart or slightly wider. Your toes should be pointing slightly outward to accommodate the natural movement of your hips and knees.
Bending Knees and Hips:
Begin the squat by bending your knees and hips simultaneously. Think of sitting back as if you’re lowering yourself into a chair. Keep your weight balanced over the middle of your feet to maintain stability.
Depth:
Lower your body until your thighs are at least parallel to the ground or go deeper if you can. Achieving parallel thighs means that your hips are roughly at the same level as your knees.
Going deeper engages your muscles more and provides a greater range of motion, but it’s important not to compromise your form or go so low that your lower back rounds.
Back Straight and Chest Up:
Throughout the entire squat, it’s crucial to keep your back straight and your chest up. This ensures that your spine remains in a neutral position and reduces the risk of injury.
Imagine maintaining a proud, upright posture as you descend and ascend in the squat.
Controlled Movement:
Lower and raise the bar in a controlled manner. Avoid sudden jerks or bouncing at the bottom of the squat. Smooth, controlled movements are essential for safety and effectiveness.
Breathing.
Inhalation:
Before you start descending into the squat, take a deep breath in through your nose. Fill your lungs with air and expand your chest. This breath serves to create intra-abdominal pressure, which stabilizes your spine and core.
Exhalation:
As you push the weight back up to the starting position, exhale forcefully through your mouth.
This exhalation helps you maintain that intra-abdominal pressure and provides a bit of extra power during the upward phase of the squat.
Breathing Rhythm:
Many lifters prefer to take a single deep breath at the top of each repetition and hold it until they complete the repetition.
Others prefer to take a breath at the top and a second breath at the top again before starting the next repetition. Find a breathing rhythm that feels comfortable and supports your stability and control.
Proper breathing technique not only contributes to your strength and stability but also ensures that you maintain a consistent form throughout the set.
It’s essential to practice and develop a breathing pattern that works best for you while performing high bar squats, especially when handling heavier weights.
Rack the Bar.
Racking the bar safely at the end of your set is an important part of performing high bar squats correctly.
Here’s a step-by-step explanation of how to do it:
Completion of Set:
Once you’ve finished your set of high bar squats and have fully stood up with the bar, take a moment to ensure that you have complete control of the weight.
Position Yourself:
Carefully and slowly walk back to the squat rack. Maintain a strong and upright posture as you move with the weight.
Locate the Hooks:
When you reach the squat rack, locate the hooks or pins where you initially set up the bar. These hooks should be at an appropriate height for you to re-rack the bar safely. If they’re not set correctly, adjust them before proceeding.
Align the Bar:
Position yourself so that the barbell is directly above the hooks. Ensure that the bar is level and centered over the hooks to prevent it from slipping off.
Lower the Bar:
To re-rack the bar, start by bending your knees and hips slightly to lower it onto the hooks. Keep your back straight and your chest up during this process to maintain proper form.
Listen for the Click:
Most squat racks have safety pins or hooks with mechanisms that click into place when the bar is correctly seated. Listen for this click or check to see that the hooks are securely holding the bar in place.
Step Away Safely:
Once you’ve confirmed that the bar is securely racked, step away from the squat rack, making sure you have cleared the bar’s path. Be cautious not to trip or stumble over any weights or equipment on the floor.
Unload Additional Weights:
If you were using weight plates on the bar, you can now remove them if needed.
Start by taking off any additional weight plates on each side of the bar. This step is especially important if you need to lighten the load for your next set or if you’re finished with your workout.
Reset for Next Set or Finish:
Depending on your workout plan, you can either reset for your next set or consider your high bar squat session completed. If you plan to perform additional sets, repeat the process, ensuring that the bar is correctly re-racked each time.
Properly re-racking the bar is not only important for safety but also for maintaining the gym’s equipment in good condition.
It’s a courtesy to other gym-goers and helps ensure that the equipment remains functional for everyone to use.
Always prioritize safety and form when performing any weightlifting exercise, including high bar squats.
A tabular on this topic here.
Here’s a table that outlines the recommended bar placement for the high bar squat, along with some approximate ratios to help you visualize the positioning:
| Aspect of Bar Placement | Description | Ratio |
|---|---|---|
| Bar Position on Back | The bar should sit on the upper back, on the trapezius muscles. | About 2-3 inches (5-7.5 cm) below the base of the neck. |
| Height of the Bar | The barbell should be set on the squat rack at an appropriate height. | Slightly below shoulder level. |
| Hand Grip Width | Your hands should be positioned on the bar slightly wider than shoulder-width. | About 1.2 to 1.5 times your shoulder width. |
These ratios are approximate guidelines and can vary depending on individual body proportions and comfort levels.
It’s important to remember that the right bar placement and grip width for you may be slightly different from these ratios.
The key is to find a position that allows you to perform high bar squats safely and effectively while maintaining proper form.
Experimentation and adjustments may be necessary to determine the ideal placement for your body.
Conclusion.
In the high bar squat, the bar should be placed approximately 2-3 inches (5-7.5 cm) below the base of the neck, set at a height slightly below shoulder level on the squat rack.
Your hand grip width should be about 1.2 to 1.5 times your shoulder width. These ratios serve as general guidelines, but individual comfort and body proportions may require slight adjustments.
Prioritizing proper bar placement and grip width is crucial for performing high bar squats safely and effectively while maintaining correct form.

Hey there, it’s Mike Rrsq, the Editor-in-Chief over at Jsquat.com, and I’m absolutely obsessed with all things squat fitness! I’ve been lucky enough to get some serious recognition for my work in this field. With a solid background in the fitness and wellness industry, I’ve been there right from the get-go, helping shape this website into what it is today.
You see, I’m not just the boss around here; I’m also a passionate contributor. I love sharing my insights through my articles, and trust me, they’re not your run-of-the-mill stuff. Each piece I write is a labor of love, filled with my expertise and real-world experience in the fitness universe. So, if you’re into fitness and looking for some inspiration, you’re in the right place!